
The Complete Guide to Painting Your Home
 Although painting the interior and exterior of the home is a lot of work, it offers a huge payoff. A fresh coat of paint makes the home look absolutely amazing and boosts curb appeal. New paint often increases the value of the home a significant amount when compared to the initial investment required.
Whether painting is something you enjoy doing or you bring in a professional, taking the right steps to prepare ensures the project goes to plan and you can enjoy all the potential benefits. Here’s what you need to know about getting the home prepared, choosing the right paint, and more as you get ready to complete this project.
Table of Contents
Choosing the Right Paint
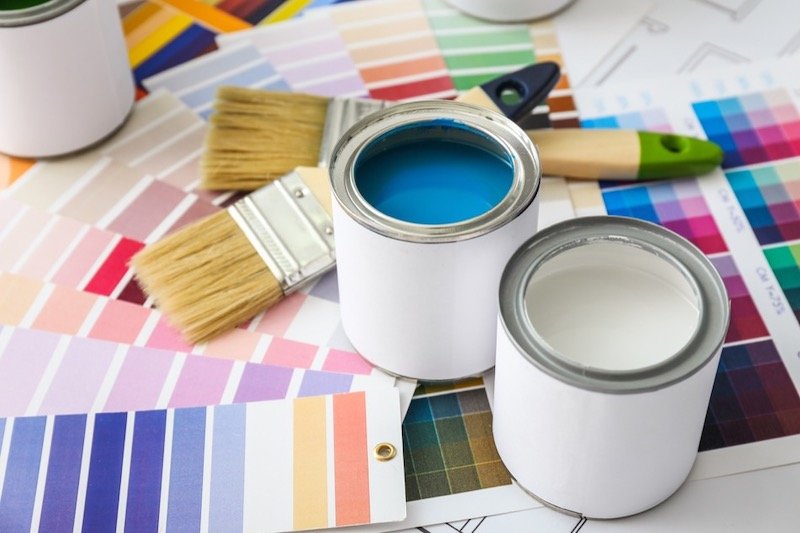
When it comes to interior and exterior painting projects, choosing the right paint is the first step in achieving the desired outcome. Before even getting into color, there are various types of paint to consider and they all have different base compounds and uses.
The pros and cons of each vary as well, making it well worth the time to figure out before starting the job. So, do the research and find the best type of paint for both the interior and exterior walls to save money and ensure the results match your vision.
What to Know Before Choosing
Before choosing the perfect type of paint for the interior and exterior of the home, there are some things to consider first. Knowing the type of paint currently on the walls, for example, can assist in selecting the best formula for each part of the house.
To find this out, wipe a hidden area of the wall with a rag slightly saturated with denatured alcohol. If any paint ends up on the rag, then the walls have water-based paint on them. If the rag comes back clean, however, then it is likely oil-based paint.
Also, consider the needs of the household. If there are young children or pets, for example, then durability might be a top priority, making oil-based paints the sure choice. Other households may not value durability, instead preferring the low odor, easy cleanup, and fast dry times of latex-based paint. Weighing the pros and cons of each choice against the needs of the household will go a long way in helping everyone choose their ideal formula.
Water-Based Paints
Also known as acrylics, water-based paints are quick and easy to apply, streamlining the process of painting the interior and exterior surfaces of the home. This type of paint skips the solvent as a base in favor of water, which keeps odor to a minimum and facilitates easy clean up.
The tradeoff is water-based formulas are not as durable and long-lasting as oil-based paints. Water-based formulas are also typically a bit more expensive per gallon, though you will save on solvents and tools needed for cleanup during oil-based paint projects. Only water is needed to wash away the wet paint from brushes, rollers, and other tools, minimizing the time and effort needed to complete this project.
Despite the relative lack of durability, water-based paints work well on both exterior and interior surfaces. You will just likely need to paint a bit more often to retain the preferred finish. They are also easily wiped clean with soap and water, especially in high-gloss formulas.
Latex-Based Paints
Although they are also water-based, latex paints are in a class all their own. This type of paint used to have a rubber base, but advancements in materials technology has changed all that. Now made with water soluble compounds, latex paint goes on easy, dries quickly, and emits minimal odor into the living space. The base compounds allow the color pigments to stand out and retain their intensity for years to come.
Latex-based paints are most often used for exterior surfaces, though they can be used inside as well. There are different formulas for indoor and outdoor use, however, so read the label to pick the right ones. Some latex-based paints are even formulated for use on the floors, even allowing for the improvement of concrete surfaces.
Like acrylic paints, latex-based formulas lack the durability of oil paint and do not last as long. Smudges and other imperfections easily wipe off with soap and water, however, making it possible to keep the finish looking great with a little bit of maintenance.
Oil-Based Paints
With oil-based paints, it is possible to achieve an ultra-hard, durable finish that will last and last. The paint goes on smooth and allows the vivid pigments to remain vibrant for years to come. Adhesion and surface penetration are well beyond anything the water-based formulas can achieve, but it does come at a cost.
Oil-based paints are hard to work with and take up to two full days to dry, leaving the area unusable in the meantime. Since this type of paint uses solvent as the carrier for the pigment, they also release noxious fumes into the air while painting and afterward.
Since this paint is not water soluble, cleanup can take a lot of time, money, and effort as well. The brushes, rollers, and other tools must be soaked in solvent to remove the paint, extending cleanup time considerably.
Oil-based paint formulas are a little less expensive than water- and latex-based formulas. And since the finish lasts much longer, you can save money in the long run by having to repaint less often.
Paint Finishes
Across all types, paint comes in a wide variety of attractive finishes, but not all work equally well in different areas of the home. Paint finishes on the market today include:
- High gloss
- Semi gloss
- Satin
- Eggshell
- Flat
At the top, high-gloss paint is extremely shiny and bright, creating a durable, easy-to-clean finish. As this finish reflects a lot of light, it is best used for trim around windows and doors, both inside and out.
Semi-gloss paint backs off on the shine, though still retains its cleanability and bright appearance. Use this paint in kitchens, bathrooms, and other high-traffic areas to make them easier to keep clean and look great.
Lower-gloss formulas, such as satin and eggshell, have a softer finish that reflects minimal light and is a bit harder to clean. They are suitable for low-traffic areas, such as family rooms, hallways, and dining rooms, that need a low-key finish.
Flat paint, also known as matte, works the opposite of high gloss, absorbing light rather than reflecting it. Only use this paint in rooms with minimal traffic, especially from kids, as it is extremely difficult to clean. Adult bedrooms and other low-traffic, kid-free zones are often best for matte paint.
Interior Preparation
With the paint type, finish, and colors selected, all that is left to do is estimate how much will be needed to do the interior space. To figure this out, measure all the interior walls, and then pick up about one gallon of paint for every 100 square feet. Rooms with a lot of windows will need less paint for the walls and more for the trim, so take that into account as well.
In addition to the paint in all the desired colors, pick up an equal amount of primer in either oil- or water-based formulas. Oil-based primers work best for heavily stained walls or when covering a dark paint color with a lighter one. Latex primers are adequate for all other projects.
After estimating the paint needs, it is time to move onto the interior preparation process. The interior space needs to be properly prepped to ensure the paint goes only on the walls and stays there. Otherwise, the paint could end up on the furniture and other unsightly areas — and fail to adhere properly in the long run. By performing the prep work, the painting process goes much faster as well and allows you to achieve your desired results.
Materials Needed for Interior Painting
Paint is only the start when it comes to the materials needed to transform the interior of the home. Other supplies needed for this project include:
- Painter’s tape
- Paint tray
- Paint roller
- Roller refills
- Extension poles
- Paintbrush set
- Cut bucket
- Stir stick
- Paint can opener
- Painter’s plastic
- Canvas drop cloths
- Double-sided tape
- Spackling paste
- Putty knife
- Palm sander
- 120-grit sandpaper
- Bucket
- Sponge
- Respirator
- Goggles
Although it is possible to get by with fewer supplies, these items will streamline the painting process and provide the perfect finish. Gather everything up and have it on hand when it comes time to start the project.
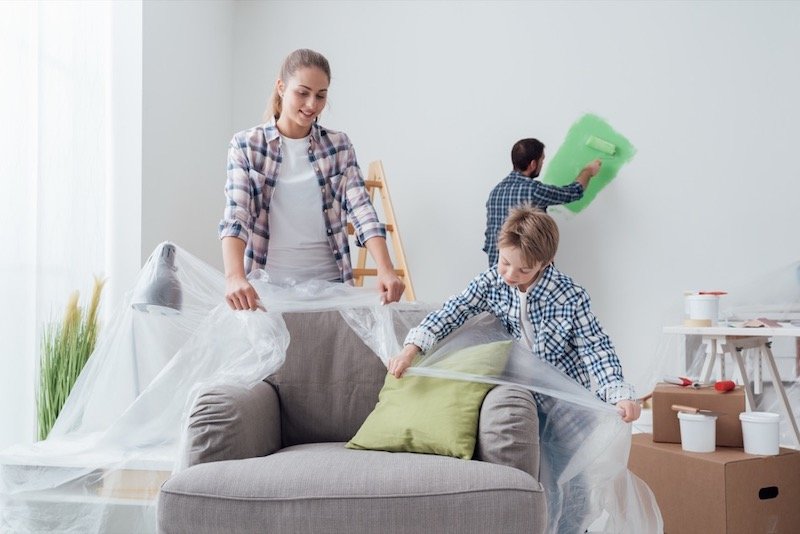
Protect the Room
In each room that needs paint, move all the furniture into the middle of the room and cover with plastic drop cloths. Then, cover the flooring with canvas drop cloths held down with a bit of double-sided tape.
Once that is done, focus on preparing the walls for paint. Using the painter’s tape, mask off around the trim to protect it from receiving a coat of the wrong type or color of paint. Only press the top third of the adhesive edge to the trim, leaving the rest hanging free for easy removal after painting.
Either remove light fixtures from the ceiling or mask around the base using painter’s plastic and tape to create a barrier. Also, remove the outlet and light switch covers and mask off around those areas.
Repair the Walls
A new coat of paint will only serve to highlight holes, dents, and other imperfections in the walls, making them stand out more than ever before. Thankfully, all it takes is a bit of repair work and the walls will be as good as new. The work put in during this step will ensure the new paint can provide a super smooth finish that is pleasing to the eye.
Before repairing the walls, it is important to mark all imperfections with a tiny bit of tape. Find the flaws by shining a bright flashlight along the wall, then mark just above the blemishes with an inch of tape. During this process, remove any nails or other unneeded hardware or replace ones starting to pop out of the wall surface. Check the corners of each wall for dents in the metal corner bead and gently pound them straight with a hammer.
With this done, go back and repair all the small holes and dents with spackling paste. To do so:
- Take a putty knife and scoop up a small amount of the spackling paste on the edge
- Start a bit above the hole or dent and firmly wipe the paste across the surface
- Allow the paste to dry for several hours before coming back to refill the area once again
The spackling paste will shrink as it dries, so this process may need to be repeated a third time to fill. Once the blemish is filled all the way, use the palm sander and 120-grit sandpaper to smooth out the paste and make it flush with the wall.
If the problem area is bigger than one and a half inches in diameter, the wall may need to be patched with new drywall instead. If there are multiple problem areas in that spot, then replacement of the drywall may be a better choice.
Remove Mildew
A combination of high moisture levels, poor ventilation, and warm temperatures allow mold and mildew to grow inside the home. In addition to being unsightly, the presence of these substances can cause health problems to arise.
Just painting over the problem areas does nothing to fix the issue either, as mold and mildew will penetrate that layer within a short time. Instead, homeowners must actively seek out the underlying problem and fix it, eliminating the chance of those substances growing back in the future.
Once this is handled, addressing the damaged drywall is the next step before painting. Depending on the severity of the mold and mildew growth, the affected drywall may need to be removed and replaced with new boards. For minimal damage, however, cleaning and priming the surface will work to keep the mold and mildew sealed in for good.
To clean the surface:
- Create a mixture of three parts water to one part bleach
- Spray the bleach mixture on the surface fungus and let it sit for a few minutes
- Wipe the bleach-treated walls dry with clean paper towels
Once the surface looks clean, allow the area to dry, and then spray it all down with undiluted white vinegar.
The vinegar will help kill the mold spores, keeping them from growing back as soon as conditions are favorable. The strong smell of vinegar will slowly disappear as the drywall dries up, but if it is bothersome, set up a fan to circulate the air in the meantime. Once the walls are dry, it is safe to move onto the next step.
Sand Surfaces
Although sanding the surfaces to be painted is not always necessary for every project, it can make a huge difference in the results. Sanding is only really necessary when replacing or repairing damaged drywall before painting. All repairs must be completed before sanding and the mud or spackle should be left be long enough to fully dry.
After that, break out the palm sander and fit it with a sheet of 120-grit sandpaper. Wear a respirator and goggles to protect your eyes and lungs from dust and debris flying through the air. Even if the sander has a filter bag attachment, the dust will get everywhere, so be prepared to vacuum and shower after finishing this step.
To sand the walls before painting, simply:
- Turn on the sander and gently press it against the wall
- Slowly move the sander across the surface, focusing on smoothing everything out
- Continue until the surface looks and feels completely even with the rest of the wall
Once the surface is sanded smooth, use a light to go over it once again, looking for imperfections. Repeat this process until the drywall is completely flat and smooth, which means it is ready for paint. Consider sanding after applying primer as well. Use the process above but focus on sanding the entire wall surface until it is completely free of blemishes.
Prime Walls
Although primer adds to the initial costs of the painting project, it can actually save money in the long run. By applying a coat of primer to the walls, it effectively seals the surface, keeping the paint from soaking into the surface. With that step, less paint will be needed to cover the walls, effectively reducing the cost of the project. Beyond that, primer helps to create a smooth, attractive surface and allows the vivid paint pigments to stand out.
The primer can be applied to the walls using brushes and rollers. Cut in with the brushes first, working carefully around the taped off edges of the room. Then, use the roller to apply primer to the rest of the room.
All surfaces that will be painted need to be covered in primer and allowed to dry completely. Only when it is dry to the touch can paint be applied over the top or the primer may come off while brushing or rolling the surface.
Latex primer will usually dry to the touch within three hours, while oil-based primer can take up to 48 hours. If temperatures inside the house are too cold or humidity is too high, then the primer will take much longer to dry.
How to Paint Each Room of Your Home
To achieve the best results, every room in the house needs to be approached differently during the painting process. Selecting one color and slapping it on the walls rarely works to achieve an attractive, lasting finish in every room. Instead, it pays to address each room separately from the next, avoiding a disastrous one-size-fits-all approach.
Bathrooms
As one of the smallest spaces in the house, bathrooms need special attention to turn out just right. They have lots of objects to maneuver around, such as the toilet and vanity, making it a tricky spot to paint.
So, make sure to have lots of different sizes of brushes and roller types on hand to get in all the tight areas with ease. In particular, have a sash brush with an angled head on hand to cut in around the toilet and other obstructions in the room. A mini paint roller can also help reach confined spaces that need primer and paint.
Choosing the right paint is key as well since the room experiences high humidity levels on a regular basis. Without a doubt, a semi-gloss finish is the best choice for the bathroom, as it is easy to keep clean and mold-free. Satin can work as well, though it will not wipe clean as easily as semi-gloss formulas. If at all possible, use an oil-based primer in this room to seal in the walls and minimize the amount of paint needed.
The color of the paint matters as well. Lighter colors can open up the room and make it feel more spacious, creating a truly comfortable space to enjoy. If the bathroom opens up into a bedroom, verify the colors will complement each other well. Avoid white paint if possible, as it will need to be cleaned more often than other colors. Pastels often work beautifully in the bathroom, as they are light enough to make the space look bigger without needing as much cleaning as white does.
To paint the bathroom:
- Use painter’s tape to mask off around the toilet, bathtub, and other key areas
- Apply primer using brushes and rollers as needed to reach tight areas
- Allow the primer to fully dry for three to forty-eight hours, depending on the formula
- Cover the walls with paint using the same tools and techniques as used for the primer
- Let the paint fully dry, and then apply another coat of paint to create a clean finish
- Remove the painter’s tape before the last coat of paint fully dries
With the completion of the last step, the bathroom is painted, but not yet ready for use. Allow the paint to dry and cure for about 24 hours before running the shower or bath. Otherwise, the paint may start to bubble and peel off the walls.
Kitchen
Although the kitchen is bigger than the bathroom, it has nearly as many tight nooks and crannies to paint. The same painting tools and techniques used in the bathroom work well in the kitchen. So, break out the mini rollers, angle brushes, and other tools allowing you to get in those tight spaces.
Since it has more room, however, color choice does not matter nearly as much, so pick whatever hues favored most. Many people love to use yellow in the kitchen as it is bright, cheery, and stimulates the appetite.
Other popular kitchen colors include:
- Marine blue
- Coral
- Light grey
- Sage green
- Wine red
- Ivory
- Lilac
Painting the kitchen in all ultra-bright hues can often feel jarring, however, leading many to pair muted tones with a vivid accent wall. To find the best options, think of the visual impact that will be achieved with each color.
Since the kitchen walls often get greasy and need to be wiped down, go with either a satin or semi-gloss for this room. This is also the reason why it is wise to thoroughly clean the walls before priming and painting.
To clean the walls:
- Mix one cup white vinegar with two gallons of warm water
- Dip the sponge into the cleaning solution and wring out most of the water
- Scrub the walls with the sponge, working from top to bottom
- Dry the walls with clean rags to complete the cleaning process
Once the walls are clean and dry, it is safe to start applying primer using brushes and rollers. The kitchen may need two coats of primer to fully cover the walls in areas that were especially greasy. As with the bathroom, an oil-based primer can provide complete coverage and create a durable surface for the paint to stick to. Latex-based primer will work in a pinch, however, though the finish may not last as long as it would otherwise.
After applying the primer and allowing it to dry, move onto putting on the first coat of paint. Allow the paint to dry for three to forty-eight hours, depending on the type, then brush and roll on the second coat. Kitchens typically only need two coats of paint to look their best, though lighter colors may look better with three coats total.
Living Room
The design of the living room sets the stage for the rest of the home and provides a relaxing backdrop for everyone in the household. For that reason, there is a lot of pressure to choose just the right color for this room. Thankfully, it is rather easy by considering the overall theme of the interior décor. Simply look at the hues used in all the décor items for the living room and adjacent rooms, and then select a complementary color.
The wall color should act as the background, making up 60% of the color in the room. Then, consider selecting a secondary color that complements the first and use it for up to 30% of the room, such as an accent wall.
From there, add an accent color to the mix, allowing it to make up the last 10% of the tones in the room. Since the living room lacks tight nooks and crannies, as found in the kitchen and bathroom, selecting the color will likely be the hardest part of painting this area.
Upon settling on a primary hue, and secondary one if you wish, decide on the ideal paint finish by reflecting on the household makeup and activities. If there are active children and teens in the house, for example, then satin would likely work best since it is easy to clean, yet not too reflective. For an adult only household, eggshell or even matte could work, though they will not wipe down easily if need be.
Unless they are extremely soiled, the living room walls do not need to be cleaned, though a coat of primer is still a good choice. Latex-based primer will work for clean walls while oil-based is the way to go if the walls are soiled by cigarette smoke, mold, or other contaminants. As soon as the primer dries, feel free to apply a coat of paint and see how it covers. At least two coats of paint are likely needed, however, to create the desired finish and achieve lasting results.
Exterior Preparation
Painting the exterior of the home can feel like a massive undertaking, especially if it is more than one story. Most houses take between four to six days to paint and that does not even include the prep work. The time invested in prep work, however, simplifies the process considerably.
To start preparing for this project, start thinking about the ideal paint colors and finishes. As with the interior project, oil-based, water-based, and latex-based paint are all great options. Oil-based paint is more durable, while the other options are easier to apply. Never use water- or latex-based paint on metal structures since it can promote rust. Only use oil-based paints on those surfaces.
As for finishes, the subtle sheen of satin finish paint is the most popular amongst homeowners, though eggshell can work, too. While easier to clean, glossier finishes are not preferred because they reflect too much light and distract from the architectural design of the home. Above all, only buy paint formulated for exterior surfaces to ensure the finish stands up to the weather.
To figure out how much paint to buy, measure the perimeter of the house, then pick up one gallon for every 300 square feet. Then, look at the condition of the siding. If it is coarse and worn, then add a few gallons to the total as it will likely suck up paint much faster than a smooth surface would. For the trim and gutters, add up the length and width of those structures, then get one gallon for every 300 square feet.
With the paint selection process out of the way, check the weather to decide when to start this project. When using oil-based paint, only plan to paint when humidity levels are low and temperatures sit in the 40 to 90 degree Fahrenheit range. Water- and latex-based paints can be applied in 50 to 85 degree Fahrenheit weather with low humidity levels. Never paint when it is raining or if it might rain within the next three to five days.
Materials Needed for Exterior Painting
As with the interior, painting the exterior of the home requires quite a bit of tools and supplies, such as:
- Brushes
- Rollers and refills
- Extension pole
- Paint tray
- Stir stick
- Hook
- Flathead screwdriver
- Painter’s tape
- Painter’s plastic
- Canvas drop cloths
- Caulk gun
- Exterior caulk
- Epoxy filler
- Putty knife
- 120-grit sandpaper
- Palm sander
- Paint scraper
- Pressure washer
- Ladder
- Respirator
- Goggles
- Gloves
By having all these items on hand from the start, you can breeze right through the painting process from beginning to end.
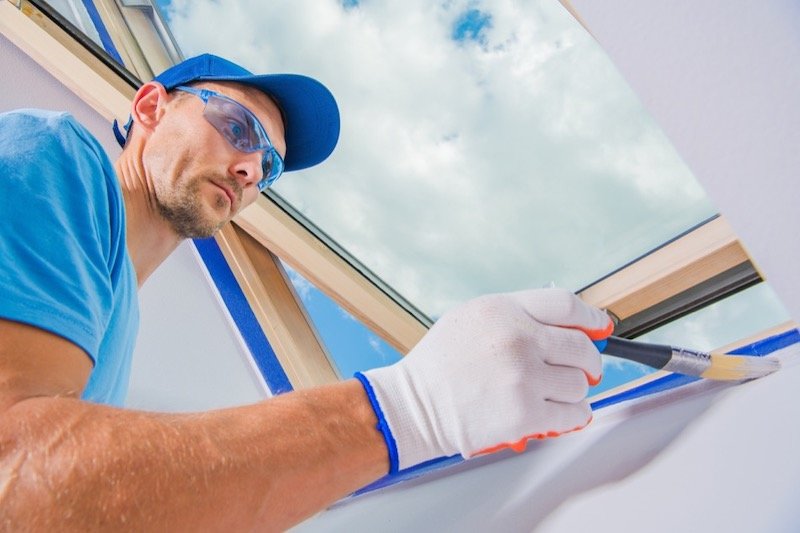
Protect Doors, Windows, and Lights
To keep paint from touching the surfaces you do not want painted, take the time to cover those areas with painter’s plastic. Start with the windows by attaching painter’s tape along the inside edges of the trim, leaving 2/3 of the strip unattached to the wall.
Then, cut off a suitably sized piece of painter’s plastic and press it to the tape to cover the window. Keep the plastic from billowing out in the wind by stretching one piece of tape from the lower to upper corner of the window. Repeat this process with the doors but make sure to leave one entryway open and accessible.
If removing the exterior lights and other accents is too difficult, also cover them with painter’s plastic held in place by tape. Tape off around the trim and gutters as well if they will receive a different type of paint than the body of the house.
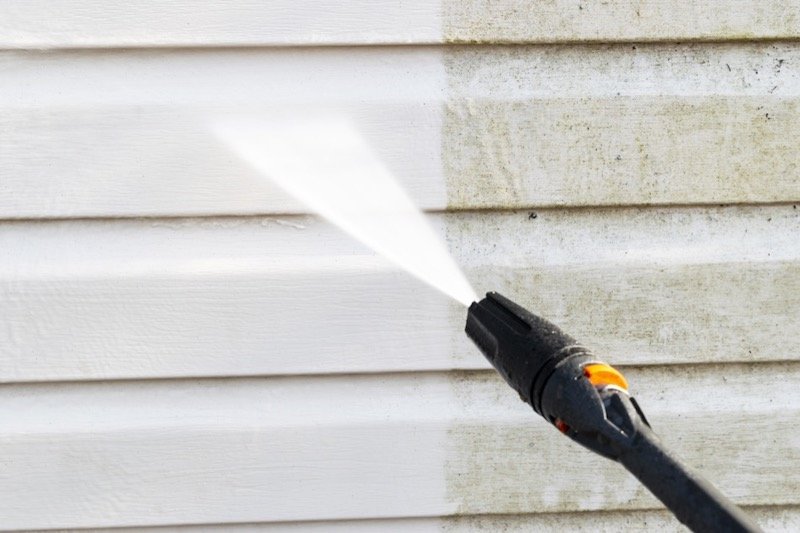
Pressure Wash the Walls
One of the most important steps in the exterior painting process is pressure washing all the walls and other surfaces. This cleans away debris and removes flaking paint, ensuring the new paint will create a beautiful, lasting finish. A pressure washer makes quick work of this step by blasting away the dirt and debris with a fast jet of water. It is important to avoid spraying too aggressively, however, or the siding could suffer damage in the process.
Before starting, take heed of all safety precautions for this step:
- Only use gas-powered pressure washers in open spaces with plenty of airflow
- For electric pressure washers, ensure the receptacle is properly grounded
- Use extension cords rated for wet locations and keep them out of puddles
- Never point the pressure washer at people or animals as it can cause serious injury
- Do not use the water jet to push objects out of the way
- Keep your feet on the ground and stay off ladders while using the pressure washer
If the water jet strikes you anywhere, seek medical help as the wounds can look minor when they are actually quite serious. Always wear gloves and eye protection along with a respirator when using a pressure washer for this, or any, project.
To pressure wash the exterior surfaces, use a 30-degree spray nozzle and work from top to bottom in wide sweeping motions. Do not allow the pressure washer to sit on any one area for more than a moment or it could gouge the surface. Continue around all sides of the house and marvel as the grime washes away in an instant.
Repair Damaged Surfaces
With the surfaces sparkling clean, closely examine the exterior walls for any signs of damage. Look for holes, dents, and other imperfections that will affect the smooth finish of the new coat of paint. Mark just above whatever you find with a small piece of painter’s tape.
Whether the exterior is made from stucco, wood, or vinyl, small blemishes and other imperfections can be easily repaired with a bit of epoxy filler. Extensive damage, however, may require replacement of a small section of siding, which will match the rest once everything is fully painted.
To perform repairs with epoxy filler, simply:
- Scrape away all paint around the damaged area using a paint scraper
- Use a flathead screwdriver to dig out all the rotted wood or other damaged material
- Use 120-grit sandpaper to smooth out all the edges around the area in need of repairs
- Mix a bit of the epoxy filler and hardener together according to the package directions
- While wearing rubber gloves, apply the filler by hand or using a putty knife
- Press the filler into the damaged area, ensuring it fills all the gaps in the siding
- Allow to harden for up to four hours, and then sand smooth with a palm sander
When working with epoxy filler, only mix up what is needed for the particular spot as it is only workable for a short time. Discard the remainder and mix up more for each spot in need of repairs.
Caulk Trim
Between the siding and the windows and doors are small gaps, which can look unsightly and allow moisture to accumulate. Over time, those gaps can start to allow the edges of the siding to rot, causing extensive damage to the home. Thankfully, this problem is easy to prevent by applying caulk before painting.
Caulk is a gooey substance that easily fills holes and gaps in its initial state before hardening up. Even when fully hardened, the caulk remains flexible, which allows it to withstand extreme temperature changes without a problem. Applying the caulk is quick and easy, though it requires a bit of prep work.
To complete this step, pick up a tube of caulk, paint scraper, and a putty knife. Then:
- Cut off the tip of the caulk tube at a 45-degree angle and remove the foil seal
- Fit the tube of caulk in the caulk gun
- Apply a thin bead of caulk between the siding and windows, doors, and other areas
- Gently smooth out the bead using the end of the putty knife or a gloved finger
- Wipe away any extra caulk with a damp cloth before it dries
Upon finishing these steps for every door, window, and other area in need of caulk, give the beads at least twenty-four hours to dry and cure before moving on.
Prime
The exterior surfaces of the home should always receive a coat or two of primer before painting. The primer seals in the epoxy filler and caulk while creating a barrier, which prevents excessive paint absorption.
When using an oil-based primer, the body, trim, and gutters of the home can all receive the same product. If using water- or latex-based primer, on the other hand, grab an oil-based formula for any metal in need of paint.
Primer needs to be applied in a thick coat, so use a paint roller or three-inch brush for the job. When covering dark exterior colors with lighter ones, or painting walls that have been heavily repaired, consider applying two coats of primer before painting. Allow between three and forty-eight hours for the initial coat of primer to dry before applying another or moving on to paint.
How to Paint the Exterior of the Home
With the exterior walls repaired, caulked, and primed, it is finally time to apply the paint. Work on the body of the home first, applying paint with a roller or brushes in even strokes. Apply the paint from top to bottom by starting just below the eaves of the house. To achieve enough reach without standing at the top of the ladder, use a paint roller with an extension pole to hit tall areas.
No matter what type of siding material is on the home, it is likely that you will need to apply two coats to achieve an even finish. Allow each coat of paint to dry for up to forty-eight hours, depending on the paint formula used for the project. After applying the second coat, take a look from a distance and up close to see if there are any uneven areas. Most paint colors and finishes look true after a second coat, however, especially if primer was applied first. If not, do not be afraid to add a third and final coat to create an even finish.
Upon achieving the perfect finish, remove all the masking from the windows and doors before the final coat dries. Removing the masking at this point will keep it from peeling up the paint and allows you to continue on to painting the trim, gutters, and doors.
Paint Trim, Gutters, and Doors
With the body of the home painted and completely dry, move on to painting the trim, gutters, and doors. These surfaces are best tackled with a set of angled and straight brushes, though mini-rollers can work, too.
Use painter’s tape to mask off around the edges of the trim along the windows and doors to protect the new paint. Then, apply the trim paint while working from the top to the bottom of each surface. Repeat this process with the gutters, making sure to only use oil-based paint on the metal surfaces.
Paint the doors last, allowing them to stay propped open until fully dry, which can take hours. As before, remove all the masking tape as soon as the paint is applied to complete this project. Then, step back and admire all the hard work that was put into painting the exterior of the home.
When in Doubt, Hire a Pro
When painting a home yourself, it really pays to follow these steps to avoid common pitfalls and achieve your desired results. So, keep this guide on hand whenever your home needs a new coat of paint, inside and out. If it all feels like too much, hiring a painting professional is still an option —and it will help knowing just what to expect during the process.